Yuggoth

Background Music

azathoth Album Cover

Azathoth 54:24

by Cryo Chamber

Buy this Album

cthulhu Album Cover

Cthulhu 1:19:42

by Cryo Chamber

Buy this Album

hastur Album Cover

Hastur 1:09:44

by Cryo Chamber

Buy this Album

nyarlathotep Album Cover

Nyarlathotep 1:05:52

by Cryo Chamber

Buy this Album

shub-niggurath Album Cover

Shub-Niggurath 57:21

by Cryo Chamber

Buy this Album

that-is-not-dead-which-can-eternal-lie Album Cover

That is Not Dead Which Can Eternal Lie 6:08

by Darkraven Games

Buy this Album

yog-sothoth Album Cover

Yog-Sothoth 1:01:08

by Cryo Chamber

Buy this Album

Buy this Product

Yuggoth

Components

Rules

Faq

Yuggoth Map Boards

Slime Mold

Loyalty Card

Slime Mold(6)

The Faction that Controls the Gate on the Slime Sea Overlook takes this Loyalty Card and is allowed to perform the new Call Slime Mold Action.

Call Slime Mold (Action: Cost 0 or 1): If you Control the Gate on the Slime Sea Overlook, place a Slime Mold in any Slime Sea Area. If no Slimes are in play, this costs 0, if at least one Slime is in play, pay 1.

Nominal Cost: 1

Combat: 2

Slimes are Monsters. They cannot be Summoned, however. They are placed on the Map via the Call Slime Mold Action, which can be performed by the player who Controls a Gate in the Slime Sea Overlook. They cannot use a Move Action to go to the Slime Sea Overlook. They have no inherent ability.

If this Gate changes Control to another Faction, all Slime Molds in play change allegiance. If the Gate is Abandoned, the Slime Molds become neutral. It is possible to declare Battle against neutral Slime Molds without affecting any other Faction. The Slime Molds do fight back, roll dice for them and mark losses normally. If a neutral Slime Mold is Pained and Madness is not in effect, their attacker chooses where they are Pained to, following normal Pain rules.

(If not playing on the Yuggoth Map, consider the words "Slime Sea Overlook" to mean "the Area with the no-Slime triangle token" and "Slime Seas" to mean "The Area with the Slime triangle token").

Watcher of the Green Pyramid

Watcher Token

Laboratory Token

No Slime Token

Slime Token

Set Up and Map Basics

Set up the Map as you would with the Cthulhu Wars Earth Map. Place the Watcher Token at 12 on the Doom Track, with the dark (asleep) side up.

If the Opener of the Way Faction is in play, it may NOT set up on any Area marked with the Yellow Sign’s Chevron glyph (these are the Laboratory, Slime Sea Overlook, and all of the Green Pyramid Areas). The Opener of the Way may set up in any other unoccupied Area.

The Yuggoth Map represents the (former) planet of Pluto, where alien horrors have established a base. It contains certain special Areas—the Laboratory, Slime Sea Overlook, and, particularly, the Green Pyramid (which is comprised of the Pyramid Slopes and the Watcher Postern).

Ocean Area names all end in the word “Sea.” Hence, the Nitrogen Sea, Polar Sea, etc., are ocean Areas for every game purpose.

Note:
The Slime Sea Overlook is a land Area, even though ‘Sea’ appears in its name.

The Laboratory

A player that Controls a Gate in the Laboratory Area can perform the Surgery Action. If Opener of the Way is in play, Yog-Sothoth can perform the Surgery Action when in the Laboratory Area. If a different Faction Controls a normal Gate in the Laboratory at the same time that Yog-Sothoth is present, both Factions may perform Surgery.

Surgery

Cost: 1 Power

If you Control the Laboratory Gate, Eliminate up to 4 of your Cultists in play and replace them with an equal number of Brain Cylinder tokens in your Faction’s Color.

You must place these Brain Cylinders in the same Area(s) as the Cultists they replace-they can replace your Cultists on Gates, immediately retaking Control of those Gates.

You can also swap out Cultists that are not on the Map, but still in play (such as some of Cthulhu’s Cultists which are Submerged, or Sleeper’s Acolyte that is on a Cursed Slumbering Gate. (Those guys are just having really bad dreams).

Brain Cylinders

Brain Cylinders are a new type of Cultist. They cannot be Recruited normally, nor can they be placed on the Map due to special abilities that place Units (such as Yellow Sign’s Desecrate).

They cannot use the Move Action, but they may perform any other game Action in addition to all Cultist functions—i.e., they earn Power during the Gather Power Phase, Create, Control, and Abandon Gates, and permit the Recruitment of Cultists in their Areas.

To Move a Brain Cylinder, one of your other Units must Move with them. Your Brain Cylinders accompany your other Unit(s) for free in a Move Action, and a single Unit can carry multiple Cylinders. You can also bring Brain Cylinders along using a movement-like ability, as long as that ability allows you to bring other, non-specific Units along. For example, you can relocate them with Submerge, but not with Screaming Dead, Seek and Destroy, Necrophagy, or Shriek of the Byakhee, because these last four mention specific Units that can be moved. Something that modifies the Move Action, such as the Shantaks’ Horror Steed ability, would allow it to transport any number of Brain Cylinders (in addition to a Cultist).

As Brain Cylinders are Cultists, they benefit from any Spellbooks or abilities that affect Cultists (for example, Black Goat’s Frenzy provides them with 1 Combat). They are NOT Acolytes, however, and so to affect a Brain Cylinder, an ability must specify that it affects Cultists (or Units).

Brain Cylinders have 0 Combat like all Cultists, and for all game purposes their cost is 0.

Brain Cylinders cannot be assigned Pain results in Battle. Because of this, they tend to be left behind in Areas as their owners are driven away in Battle. They are also immune to Pain-like retreats, such as Windwalker’s Howl or Pains inflicted by Opener’s Dread Curse. Kills can still be assigned to them (remember, Kills must be assigned before Pains, so Brain Cylinders cannot help you avoid Kills or Eliminations in Battle).

Important:
In addition, Brain Cylinders by themselves do NOT prevent Units from being Pained into their Areas in a Battle. Brain Cylinders by themselves cannot surround and therefore Eliminate enemy Units.

Capturing a Brain Cylinder is like Capturing any other Cultist, and follows the same rules. However, when a Cylinder is Captured, you may choose instead to “Convert” it into a Cylinder of your own Faction’s Color, leaving it on the Map. Each Faction has a hard limit of 4 Cylinders, so if you already have four Brain Cylinders in play and Capture a fifth, it cannot be Converted. It must be placed on your Faction Card to be Sacrificed in next Gather Power Phase.

Note:
A special bonus Laboratory token has been included in this Expansion. This is not for the Yuggoth Map itself (as there is already a Laboratory Glyph on the Yuggoth Map). This token is intended to allow players to experiment with their own house rules, permitting them to access the Laboratory Area, the Surgery Action, and Brain Cylinders on other Cthulhu Wars Maps! We suggest a hard rule that no player may have a Start Area in the Laboratory Area (including Opener of the Way).

Alternately, you may play a variant where Yuggoth has 2 Areas where you can perform the Surgery Action. If you use the token on Yuggoth, we suggest not putting it on the Slime Sea Overlook, nor anywhere on the Green Pyramid.

This token is purely for player experimentation; Petersen Games has not extensively tested these variants for game balance!

The Slime Seas

The Faction that Controls a Gate on the Slime Sea Overlook takes this Loyalty Card and is allowed to perform the new Call Slime Mold Action.

If Opener of the Way is in play, Yog-Sothoth may perform the Call Slime Mold Action by being in the Slime Sea Overlook. However, if there is also a normal Gate in the Overlook and it is Controlled by a different Faction, then Yog-Sothoth CANNOT perform this Action. Only one Faction at a time may perform the Call Slime Mold Action, and a normal Gate in the Overlook takes precedence over Yog-Sothoth.

Call Slime Mold

Cost: 0 or 1

If you Control a Gate on the Slime Sea Overlook, place a Slime Mold into any Slime Sea Area. If there are no Slimes in play, this costs 0; if at least one Slime is in play, the cost is 1. Slimes are Monsters, but they cannot be Summoned. They may only be brought into play via this Action.

Slime Molds have a Combat of 2 and no inherent abilities.

Slimes cannot use a Move Action to go to the Slime Sea Overlook (but they may be Pained there or arrive via other means, such as Great Cthulhu’s Submerge or Shub-Niggurath’s Avatar).

The Faction that Controls a Gate in the Slime Sea Overlook controls all Slime Molds. If this Gate becomes Controlled by another Faction, all Slime Molds in play change their allegiance to the Gate’s new Controller. If the Gate is Abandoned, the Slime Molds become uncontrolled.

It is possible to declare Battle against uncontrolled Slime Molds without affecting any other Faction. The Slime Molds do fight back—roll dice for them and mark losses normally. If an uncontrolled Slime Mold is Pained (or Retreated) and Madness is not in effect, their attacker chooses the Area to which they are Pained, following normal Pain rules. Uncontrolled Slime Molds can also be affected by other abilities that target Monsters (or Units). For example, Tsathoggua may use Capture Monster on one, and Shub- Niggurath may Avatar with an uncontrolled Slime Mold.

Special Rule for Black Goat:
Although you may not Summon Slime Molds (you may only “Call” them), Black Goat’s Fertility Cult will allow it to Call as many Slime Molds as desired, and in conjunction with Summoning other Monsters. The Slime Molds must still appear in the Slime Sea, even when Fertility Cult is used in their creation.

Note:
Two bonus Slime Tokens are included in this Expansion. These cannot be used on the Yuggoth Map, as they would lead to confusion. To use them, place each one in a separate Area of another Map expansion (or on the Earth Map). You can perform the Call Slime Mold Action in the “No Slimes Allowed” Area, if you Control a Gate there. The other Area is where the Slimes must appear when Called. All the same rules for Slimes apply. These tokens are purely for player experimentation; Petersen Games has not extensively tested this variant for game balance!

The Green Pyramid

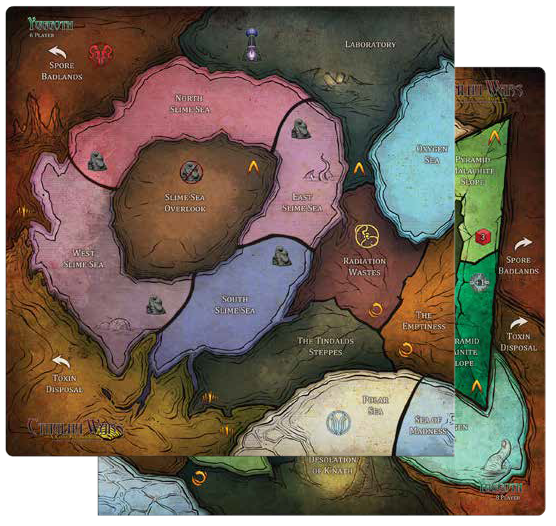
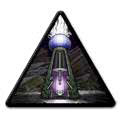
The Slopes of the Pyramid and Watcher Postern

The Green Pyramid consists of 2-4 Areas, depending on which side of the Map you are using. These Areas are all marked; one mark in each Area is the die roll result on which the Watcher appears; the other mark is a symbol indicating that Controlled Gates on the Pyramid earn their Controller 1 additional Power during the Gather Power Phase. Therefore, Controlled Gates on any Green Pyramid Area (including the Watcher Postern) produce 3 Power in each Gather Power Phase instead of 2. (Yog-Sothoth produces 3 Power if he is in a Green Pyramid Area during this Phase).

Abandoned Gates on the Green Pyramid still only produce 1 Power for all Factions.

The Watcher

The Watcher of the Green Pyramid is a hideous abnormality, a monstrous fellow to the Great Old Ones. It dwells in the abysses beneath the Green Pyramid. Activity on Yuggoth periodically brings forth the Watcher, to ravage and destroy.

Doom Phase-The Watcher Awakens

At the end of the Doom Phase, after all players have had a chance to perform a Ritual of Annihilation and if there is a Controlled Gate in any Green Pyramid Area, roll a die. If the result equals the number printed on an Area with a Controlled Gate, the Watcher Awakens. Flip the Watcher Token to the lit-up (Awakened) side, and place its figure on the Watcher Postern (regardless of the number rolled).

Yog-Sothoth’s presence in a Green Pyramid Area counts for Awakening the Watcher, even if a normal Gate is not Controlled in the same Area.

Should any player’s Doom Marker pass over the dark Watcher Token, flip it to the light (Awake) side. Thus, when a player first reaches or exceeds 12 Doom, the Watcher Awakens (if it is not already Awake). If a player’s Doom reaches 12 during an Action Phase (due to turning in Elder Signs, for example), the Watcher won’t Awaken until the following Doom Phase.

The Watcher Decays

If the Watcher is already Awake before the Doom Phase begins, roll a die and lower the Watcher Token’s position on the Doom Track by that many spaces. If it Decays to 0, it is Killed; remove it from the Map. In this way the Watcher gradually dwindles and eventually vanishes, even if no players inflict Kills on it in Battle, but it may re-Awaken later!

Never Decay the Watcher on the Doom Phase in which it Awakens (and never re-Awaken the Watcher in the same Doom Phase in which it reaches 0).

Action Phase—The Watcher Attacks

If the Watcher is Awake at the start of the Action Phase, then it will Attack. This occurs before the First Player takes a turn.

The Watcher Attacks once per player. The First Player Controls its first Attack, followed by the next player, and so forth, until each player has had a chance to Control it once or until it has been destroyed.

Controlling the Watcher

On each Watcher Attack, the controlling player must Move the Watcher into an adjacent Area of his choice that contains Units belonging to any Faction. If no player’s Units are in an adjacent Area, the Watcher may be teleported to any Area containing any player’s Units. The Watcher may never remain in the same Area. A player may return the Watcher to Attack an Area it moved from earlier in the same Action Phase.

Immediately after moving, the Watcher initiates a Battle with Combat dice equal to the Watcher Token’s position (initially, twelve). It attacks EACH Faction in the Area separately and independently, in the order chosen by the controller. Example: if two Factions, including the player’s Units, are in the Area, the player can choose to have himself attacked second, hoping the Watcher will have lost strength by the time it gets to him. If the Slime Molds are neutral, it does not attack them. Any number of Battles in a single Area, against multiple Factions, counts as a single Watcher Attack.

The defending Faction rolls Combat dice against the Watcher as normal; each Kill rolled drops the Watcher Token down 1 point on the Doom Track. The Watcher is immune to all Pain.

The Watcher is a Great Old One. While Spellbooks and abilities can be used in Battle against it, they may only affect your own Units. For example, you cannot use Windwalker’s Howl to send the Watcher out of the Battle Area, nor does Demand Sacrifice have any effect on the Watcher’s dice results.

The Watcher costs 0 Power, has no Spellbooks or Doom, and is considered for all purposes to have no Power of its own or any other normal features of a Faction, such as calculating the Combat of Tsathoggua, Ithaqua, Nyarlathotep, etc. As a Great Old One, however, the Watcher can provide Nyarlathotep with 2 Elder Signs for scoring a Kill against it. It is immune to Pains, so Nyarlathotep must actually score a Kill (multiple Kills against the Watcher do not provide Nyarlathotep with additional Elder Signs).

Once the first Watcher Attack has been completed, the second player then takes Control of the Watcher for the next Attack (which, again, includes both a Move and a Battle). This continues until all players have Controlled the Watcher once (or until it has been destroyed). At that point, the First Player takes his own first turn as normal. During the rest of the Action Phase, any player may initiate a Battle against the Watcher. It will roll its Combat dice and ignore all Pains as normal.

When the Watcher’s Token drops to 0 on the Doom Track (even if it reaches 0 due to Watcher Decay in the Doom Phase), its figure is removed from the board and the Watcher Token is flipped back to the dark, sleeping side. That token is then placed back at 12 on the Doom Track. It will re-Awaken if another player’s Doom Marker reaches 12, or via the die roll as normal. If all players have already reached or exceeded 12 Doom, then the Watcher will only re-Awaken via die roll.

Tip:
Since the Watcher first Awakens on the Watcher Postern and it must Move into an adjacent Area with Units, you might at first feel safe by having a Gate on the Watcher Postern itself . Be aware that the Watcher may simply return to the Postern on its second Attack!